Spring boot学习笔记

一.Spring Boot 概述

Spring Boot 是所有基于 Spring 开发的项目的起点。Spring Boot 的设计是为了让你尽可能快的跑起来 Spring 应用程序并且尽可能减少你的配置文件。

二.spring boot 项目快速搭建

1.Spring Initializr

使用idea的Spring Initializr新建项目,maven会自动安装依赖包

新建项目示例:https://www.cnblogs.com/wmyskxz/p/9010832.html
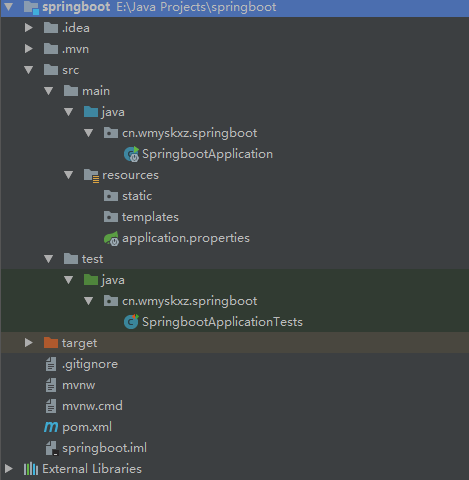
2.项目结构

  • SpringbootApplication: 一个带有 main() 方法的类,用于启动应用程序
  • SpringbootApplicationTests:一个空的 Junit 测试了,它加载了一个使用 Spring Boot 字典配置功能的 Spring 应用程序上下文
  • application.properties:一个空的 properties 文件,可以根据需要添加配置属性
  • pom.xml: Maven 构建说明文件

img

3.启动Spring Boot

  • pom.xml添加配置
1
2
3
4
5
<dependency>
   <groupId>mysql</groupId>
   <artifactId>mysql-connector-java</artifactId>
   <scope>runtime</scope>
</dependency>
  • application.properties中添加配置
 1
 2
 3
 4
 5
 6
 7
 8
 9
10
11
12
13
14
15
16
17
18
19
20
21
22
23
24
25
26
27
#页面默认前缀目录
spring.mvc.view.prefix=/WEB-INF/jsp/
#响应页面默认后缀
spring.mvc.view.suffix=.jsp

#应用名称
spring.application.name=springboot_test

#访问根路径
server.servlet.context-path=/
#访问端口号
server.port=8080
#编码格式
server.tomcat.uri-encoding=utf-8

#数据库相关配置
spring.datasource.driver-class-name=com.mysql.cj.jdbc.Driver
spring.datasource.url=jdbc:mysql://localhost:3306/dy
spring.datasource.username=root
spring.datasource.password=root
spring.datasource.max-idle=10
spring.datasource.max-wait=10000
spring.datasource.min-idle=5
spring.datasource.initial-size=5

#session生命周期
server.servlet.session.timeout=30m
  • 添加访问控制器IndexController
 1
 2
 3
 4
 5
 6
 7
 8
 9
10
11
12
13
14
package com.dy.springboot_test.web;

import org.springframework.stereotype.Controller;
import org.springframework.web.bind.annotation.RequestMapping;
import org.springframework.web.bind.annotation.RestController;

@RestController
public class IndexController {
    private static final String INDEX = "index";
    @RequestMapping("/")
    public String getIndex() {
        return INDEX;
    }
}
  • 利用 IDEA 启动 Spring Boot

img

img

img

三.解析 Spring Boot 项目

1.解析 pom.xml 文件

Spring Boot 的父级依赖:

org.springframework.boot spring-boot-starter-parent 2.0.1.RELEASE

有了这个,当前的项目才是 Spring Boot 项目,spring-boot-starter-parent 是一个特殊的 starter ,它用来提供相关的 Maven 默认依赖,使用它之后,常用的包依赖就可以省去 version 标签。

2.应用入口类

Spring Boot 项目通常有一个名为 *Application 的入口类,入口类里有一个 main 方法, 这个 main 方法其实就是一个标准的 Javay 应用的入口方法。

@SpringBootApplication 是 Spring Boot 的核心注解,它是一个组合注解,该注解组合了:@Configuration、@EnableAutoConfiguration、@ComponentScan; 若不是用 @SpringBootApplication 注解也可以使用这三个注解代替。

  • 其中,@EnableAutoConfiguration 让 Spring Boot 根据类路径中的 jar 包依赖为当前项目进行自动配置,例如,添加了 spring-boot-starter-web 依赖,会自动添加 Tomcat 和 Spring MVC 的依赖,那么 Spring Boot 会对 Tomcat 和 Spring MVC 进行自动配置。
  • Spring Boot 还会自动扫描 @SpringBootApplication 所在类的同级包以及下级包里的 Bean ,所以入口类建议就配置在 grounpID + arctifactID 组合的包名下(这里为 cn.wmyskxz.springboot 包)

3.Spring Boot 的配置文件

Spring Boot 使用一个全局的配置文件 application.properties 或 application.yml,放置在【src/main/resources】目录或者类路径的 /config 下。

4.Spring Boot 热部署

 1
 2
 3
 4
 5
 6
 7
 8
 9
10
11
12
13
在pom.xml中直接引入依赖

<dependency>
        <groupId>org.springframework.boot</groupId>
        <artifactId>spring-boot-devtools</artifactId>
        <optional>true</optional>
</dependency>              

在idea中设置

1) “File” -> “Settings” -> “Build,Execution,Deplyment” -> “Compiler”,选中打勾 “Build project automatically” 。 
2) 组合键:“Shift+Ctrl+Alt+/” ,选择 “Registry” ,选中打勾 “compiler.automake.allow.when.app.running” 。               

四.Spring Boot 支持 JSP

第一步:修改 pom.xml 增加对 JSP 文件的支持